You have created a few posts on your WordPress site probably. Now you want to display the author bio on the top or bottom of each post.
The easiest way to do it is to install an author bio plugin from the WordPress repository.
But that’s just one way of doing it.
You can show the author’s bio in WordPress using code, from the theme settings, or by placing a widget on the sidebar.
Keep reading to know more!
What is an Author Bio Box & What does It Look Like?

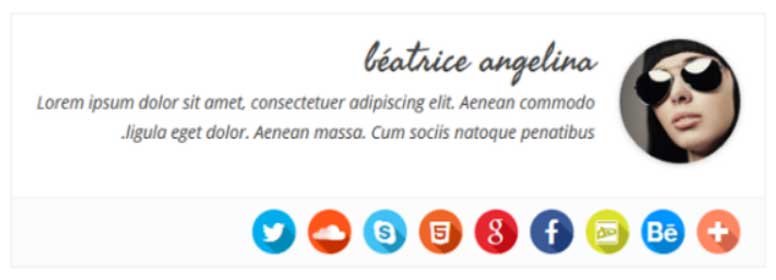
Here’s what an author bio or more commonly known as an author box looks like. This section usually comes at the end of a blog post and it provides short info about the author.
Sometimes, the author box will also link to the author’s social media pages, their personal website, or other articles that the author has written for the blog.
Why Is An Author Info Box Essential?
Creating a blog authority is one of the conditions behind higher engine rankings. While there are a lot of ways to build your blog’s authority, having an author bio is one of them.
A blog post with an unknown author or no author names at all lacks credibility. Because readers will have doubt as to what is the writer’s qualification and if the post is at all legit.
If a simple author box that has the author’s name, picture, and some information regarding his passion and qualification can increase the authority of the post many times.
More often than not, it helps to connect your readers on a personal level and they don’t feel they are reading a post written by a ghost.
4 Effective Ways to Create Author Bio on WordPress Posts
1. Find a Theme that has Built-in Author Bio Settings
Most WordPress themes these days come with built-in author box settings. Usually, themes built for blogging will definitely have one.
For that, you have to choose the right WordPress theme.
All you have to do is scroll to Users > All Users inside your WordPress dashboard. Then you can create as many authors with relevant information and pictures.
But.. sometimes, your theme might not have this setting. And the built-in author box is mostly super simple and lacks creative elements.
In that case, you can use relevant WordPress plugins to make a stunning author bio.
2. Install an Author Box WordPress Plugin
This is the easiest method when your theme doesn’t have an author bio box by default.
There are tons of free author bio box plugins in WordPress. And in most cases, these plugins are easy to install and self-explanatory. You can add extra visual elements as well depending on the plugin’s capabilities.
You will find a list of our recommended author box plugins at the end of this post.
3. Keep the Author Box in the Blog Sidebar
A lot of blogs these days will have the author info in the sidebar usually at the right side of the post at the top.
This might look fancy but it’s actually easy to create.
All you need to do is install the Meks Smart Author plugin. The author box this plugin creates is fairly easy to customize and you can make the box small or large without going into coding.
The best part is it’s absolutely FREE!
4. How to Add Author Bio without Plugin
This is a manual method. Use code to add the author box in WordPress.
While there are a number of ways to build an author box with code, here’s what I do usually.
I only recommend going down this way if you want to experiment with coding or you want to develop an author box from the scratch.
Step 1: Create a Child Theme
There are a lot of tutorials online to help you create a child theme. Once done, you can move to the next step.
Watch this quick tutorial to create a child theme using a plugin. This is a super easy tutorial by WPCrafter.com.
Step 2: Create a single.php file
The easy way to do it is to copy the ‘single.php’ file from your parent theme folder to the child theme folder. In the above video, can learn how to copy a file from the parent theme to the child theme.
Step 3: Insert the PHP code
Copy the code below and paste it inside the single.php file right after the the_post(); tag.
<h4 class="about-the-author">About The Author</h4>
<div class="postauthor-wrap">
  <span itemscope itemprop="image" alt="Photo of <?php the_author_meta( 'display_name' ); ?>">
  <?php if(function_exists('get_avatar')) { echo get_avatar( get_the_author_meta('email'), '100' ); } ?>
  </span>

  <h5 class="vcard author" itemprop="url" rel="author">
    <a href="<?php echo esc_url( get_author_posts_url( get_the_author_meta( 'ID' ) ) ); ?>" class="fn" itemprop="name">
      <span itemprop="author" itemscope itemtype="https://schema.org/Person">
        <?php the_author_meta( 'display_name' ); ?>
      </span>
    </a>
    <span class="author-aka"> a.k.a
      <span class="author-aka-name">
        <?php echo get_the_author_meta('twitter'); ?>
      </span>
    </span>
  </h5>

  <?php the_author_meta('description') ?>

  <span class="post-author-links">
    <?php if (get_the_author_meta('facebook') != ''): ?>
    <a class="author-link f" title="Follow on Facebook" href="<?php echo get_the_author_meta('facebook'); ?>" target="_blank">
      <i class="fa fa-facebook"></i>
    </a>
    <?php endif; ?>
    <?php if (get_the_author_meta('twitter') != ''): ?>
    <a class="author-link t" title="Follow on Twitter" href="https://twitter.com/<?php echo get_the_author_meta('twitter'); ?>" target="_blank">
      <i class="fa fa-twitter"></i>
    </a>
    <?php endif; ?>
    <?php if (get_the_author_meta('googleplus') != ''): ?>
    <a class="author-link g" title="Follow on Google+" href="<?php echo get_the_author_meta('googleplus'); ?>" target="_blank">
      <i class="fa fa-google-plus"></i>
    </a>
    <?php endif; ?>
   </span>
</div>
Note: be careful when editing the theme file. It can break your site entirely.
If you really want to do this, you can check out my theme customization service.
Step 4: Customize the Style of the Author Box
For this, you will have to copy and paste the below CSS code in the style.css file of the child theme. You can tweak this code to change the color and size of the box to your liking.
You can hire me to do that as well.
/*-Author Box---------------------------*/
.postauthor-wrap {
float: left;
width: 100%;
clear: both;
padding: 30px;
background: #fff;
box-sizing: border-box;
border-radius: 2px;
-webkit-box-shadow: 0 3px 5px 0 rgba(0,1,1,.1);
-moz-box-shadow: 0 3px 5px 0 rgba(0,1,1,.1);
box-shadow: 0 3px 5px 0 rgba(0,1,1,.1);
}
.postauthor-wrap .fn {
font-size: 24px;
}
.postauthor img {
float: right;
margin-left: 10px;
margin-right: 0px;
margin-bottom: 20px;
border-radius: 50%;
}
.author-aka {
font-size: 16px;
text-transform: lowercase;
font-weight: normal;
color: #5e5e5e;
}
.author-aka-name {
font-size: 17px;
text-transform: lowercase;
font-weight: normal;
color: #111111;
}
.post-author-links {
display: inline-block;
}
a.author-link {
background: #cc0000;
color: #fff;
width: 30px;
text-align: center;
line-height: 1;
height: 30px;
font-size: 12px;
padding: 10px 0;
box-sizing: border-box;
border-radius: 100%;
margin: 0 7px 0 0;
float: left;
}
a.author-link.f {
background: #3b5998;
}
a.author-link.t {
background: #2DA8D2;
}
a.author-link.w {
background: #e64522;
}
Step 5: Configure the Author Profile
Now, go to Users > Your Profile and then customize the role, name, and info of the author. Now you can see an author box at the bottom of each of your posts.
Still, Want To Use Plugins for the Author Box?
If you still want to use a plugin to show the author bio box at the end of the blog post. Here is a shortlist of the best author bio plugins WordPress.
1. Simple Author Box
The simple author box plugin will let you create this kind of author box in no time.
It looks great. But what I love about this plugin is you can add up to 30 social media profiles below the author info.
Moreover, you can customize everything from color to text to match the style of your theme.
2. WP Post Author
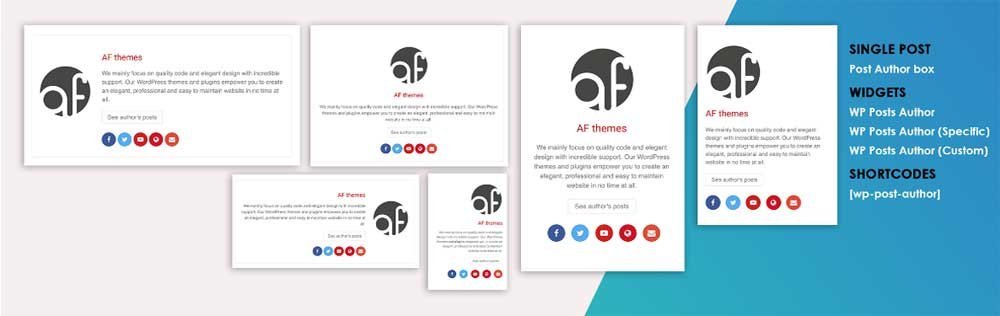
I used this plugin a couple of times and found it a lot easy to play with.
You can customize the author’s name, picture, info, and social media icons. It also has a shortcode option to let you place the author box exactly where you want in your posts.
3. Starbox Author Box
Starbox author box has 50,000 active installations on WordPress sites. So, it’s quite popular among bloggers.
It has a slightly different feel to it and you can also add the latest post tab next to the bio. The best part is you can customize individual author boxes for each author separately.
4. Molongui Authorship
The Molongui Authorship plugin lets you add multiple authors for a single post.
I use this plugin for posts that are written by multiple writers and this helps to give credit to all of the people involved in creating the content.
It also has a pro version that lets you customize more and use shortcodes.
Does your Website Lack Authority? Connect with WPBravo
Apart from adding an author bio, there are more things you can do to increase the authority of your blog. Like acquiring High DA backlinks, creating high-value content, optimizing your website structure, getting ranked regularly on Google, etc.
Sadly, most of these tasks are time-consuming and require technical knowledge and years of experience. As Google keeps getting updated every few months, old tactics don’t work.
Connect with WPBravo and we will take on the task of increasing your website’s authority at affordable prices.