If you’re running a WordPress website and not using Facebook pixel, you’re missing out on a lot of potential traffic and sales. Facebook pixel allows you to track how people interact with your website to optimize your content and advertising for maximum results.
I’ll show you how to add facebook pixel to WordPress in this article.
There are two ways to do it. One is adding facebook pixel to WordPress manual, and another is using a WordPress plugin.
But in both cases, you have to create a Facebook pixel first.
How to Add Facebook Pixel to WordPress with Plugin?
In order to create a Facebook pixel, you need to create a business manager account from business.facebook.com first. If you have that already, you don’t need to create another one.
Log in to your business manager account to create facebook pixel code.
If you don’t have a Facebook business manager account, watch a quick tutorial to know how to create that.
Creating a Facebook business manager account is very simple.
Isn’t it?
Once you have created an account. Navigate to the business setting.
To do so, click on the down arrow button on the left top corner then click on the gear icon of your business manager’s name. Like the image below (Step # 1).
You will be redirected to a new page. Click on More Business Settings (Step # 2).
Navigate to Data Sources then click Pixels (Step # 3)
There will be a list of pixels on the left sidebar if you have created any pixel before. Similar to the image below (Window # 1)
Otherwise, it will show you Add button like on the image below (Window # 2).
- Now click on the add button to create your pixel.
- A Pop-up window will show up to ask your Pixel Name.
- Name it anything you want.
- Then click to Continue button.
- A new window will appear, Your Pixel Isn’t Ready to use Yet.
- Click to Set Up the Pixel Now.
Now you have to choose whether you want to add facebook pixel code to WordPress with a plugin or without a plugin.
In this article, I will show you both.
But for now, let’s see how to add facebook pixel to WordPress with a plugin.
- You will see Connect Website Activity Using Pixel window, now click to Add code using a Partner Integration.
- From Choose a partner window, select WordPress.
Now you have to connect the WordPress website to meta.
Now leave it as it is.
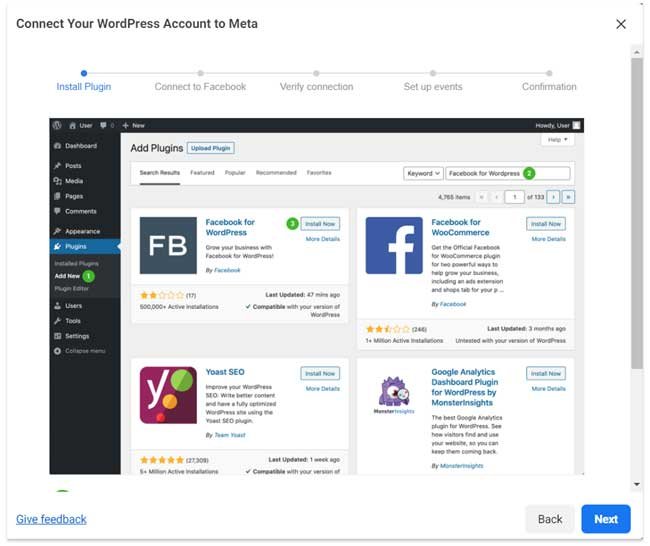
Install Facebook for WordPress Plugin & Configure
Open a new Tab in your browser and go to your WordPress site dashboard. Go to Plugins and search for the plugin Facebook for WordPress.
Then install and activate it.
Now configure that plugin.
To do that, hover over to settings then click on Facebook. It will bring you to connect your business to facebook window.
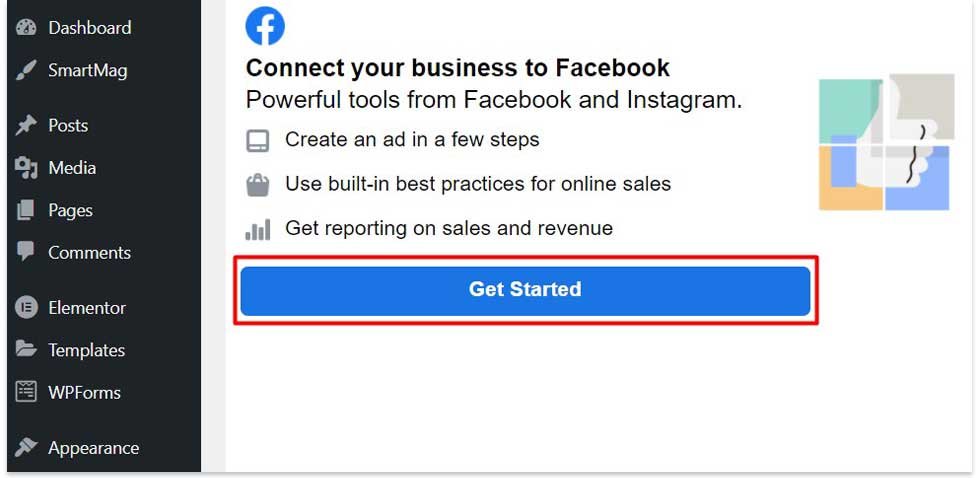
- Click on Get Started.
- A pop-up will come and ask your permission, click continue [Your Facebook Name].
- You will see Connect WordPress App to Facebook, click the continue button below.
- Then you will see the window like below.
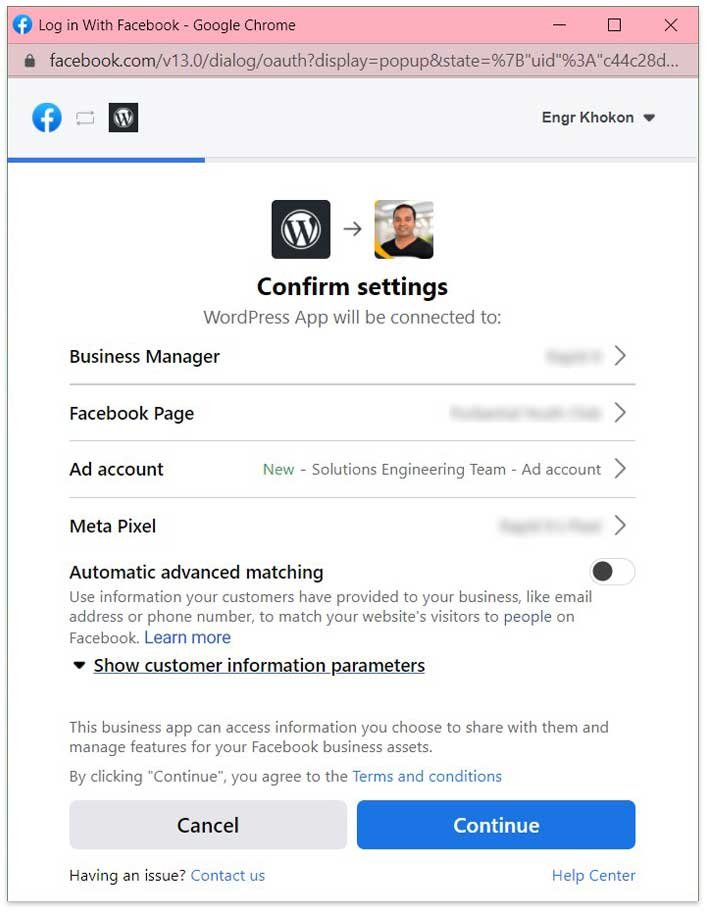
- If everything is okay, click on the continue button.
- On What is WordPress App allowed to do? window, click next. It will connect the WordPress site to Facebook. Wait a minute.
- Now complete the setup, click Done!
We are at the final stage. You will see the option below.
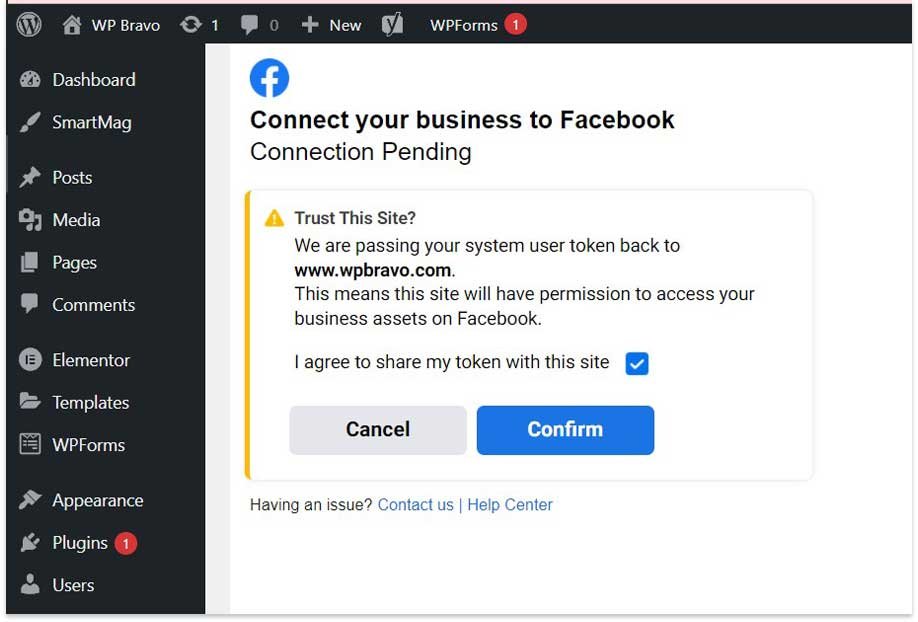
- Click on the check box.
- Now click confirm.
The configuration is finished!
How to Add Facebook Pixel to WordPress without Plugin?
Adding Facebook pixel manually is so easy as well.
Let’s see how to do that.
First of all, we have to collect facebook pixel code.
To do that, Please follow every steps of avobe, until you see the window Connect Website Activity Using Pixel.
There, instate of Add code using a Partner Integration, we will choose Manually add pixel code to website.
When you will click to Manually add pixel code to website you will see another window with your pixel code with instructions.
Copy those codes!
Where to Add Facebook Pixel Code in WordPress?
Since you have the pixel code now, you have inserted that into your website to start tracking your traffic.
If you do not know coding very well, you can download a plugin called “Insert Headers and Footers” that will allow you to quickly paste the code into the WordPress theme header.
This is not a mandatory plugin in this case, but this plugin will allow you to modify or add any codes into the header and footer without messing up your original code.
This video will show you how to install that plugin & and how this works.
- So, first, install that plugin into your WordPress website and activate it.
- Then go to the settings -> Inserts Headers and Footers.
- You will see a page with empty boxes where you can write or paste codes.
- Now, paste your Facebook pixel code into that box and save it.
If you know how to edit the theme header.php file, then you don’t need to install this plugin. You can paste that pixel code directly before the </header> tag.
After that, save it to add Pixel to your website.
Note: If you don’t use the child theme & update or change the theme later, the code will no longer be there if you past code in the theme header.php file.
As a result, your Facebook pixel won’t work.
So, pasting code into the plugin is a better way if you are a newbie.
Add Facebook Pixel With PixelYourSite
If you have multiple ad accounts on different social media platforms, adding a dedicated plugin for Pixel would be better.
In that case, PixelYourSite is the best and most convenient plugin.
First, install and activate the plugin, then go to the plugin page.
There you have to put only your pixel id. You do not have to paste a bunch of codes to run the Pixel.
After putting the Facebook pixel ID, save it.
Test Your Facebook Pixel
While you have done all the processes. It is time to test if it is working or not.
Here is how you can test quickly.
- First, open the Facebook pixel helper. This is a free Chrome extension that helps you troubleshoot pixel issues.
- Once you have the Facebook pixel helper installed, open your website in Chrome and click on the Facebook pixel helper icon in the toolbar.
- The Facebook pixel helper will show you whether your Pixel is installed and firing correctly. It will also show you any errors that may be preventing your Pixel from firing.
- If you see any errors, you’ll need to troubleshoot them and fix them before you can start running Facebook ads.
Conclusion
Pixel tracking is an important part of Facebook advertising. It allows you to track the actions of people who see or click on your ads and helps you measure the effectiveness of your campaigns.
Therefore, make sure your Facebook pixel is working fine and providing the data that you need to maximize your conversion.
I hope this post will help you to set up a Facebook pixel in your WordPress website.
If you are new to WordPress and want to earn money from your website, read how to start a WordPress blog and make money. I explain the budget to earn money from blogging.
Need Help Setting Up Your Facebook Pixel? If you are busy or if you think it is hard for you to configure Facebook pixel. Let us know.
I can help you to set up the Facebook pixel that will boost your business. I can help you from start to finish.